
Shoulder Conditions
Rotator cuff tears, instability, impingement, and shoulder arthritis, managed with the same evidence-based approach used across all HSS Sports Medicine care.
Shoulder Conditions
{{ c.anatomy }}
{{ c.condition }}
{{ c.classifications }}
Measured on CT, this describes how the socket has worn and how far back the humeral head has shifted. It is the main anatomic driver of implant choice and of whether an augmented glenoid component or bone graft is needed.
| Type | Wear pattern | Surgical implication |
|---|---|---|
| A1 / A2 | Centred humeral head with symmetric wear — minor in A1, deeper central erosion in A2 | Generally the most straightforward anatomic replacement; A2 may need central bone management |
| B1 / B2 / B3 | Posterior subluxation of the head with progressive posterior wear — joint-line narrowing (B1), a biconcave socket (B2), or a single retroverted worn face (B3) | Version must be corrected: augmented glenoid components, eccentric reaming, or a reverse replacement in severe wear |
| C | Dysplastic glenoid with severe congenital retroversion, usually without posterior erosion | Correction is limited by bone stock; often best served by a reverse replacement |
| D | Anterior subluxation or glenoid anteversion, often after prior instability surgery | Anterior wear and soft-tissue imbalance are addressed; frequently a reverse replacement |
Superior migration of the humeral head with cuff deficiency (cuff tear arthropathy, graded separately by the Hamada and Favard systems) is treated as its own category and points toward a reverse replacement regardless of glenoid type.
{{ c.riskFactors }}
{{ c.symptoms }}
{{ c.diagnosis }}
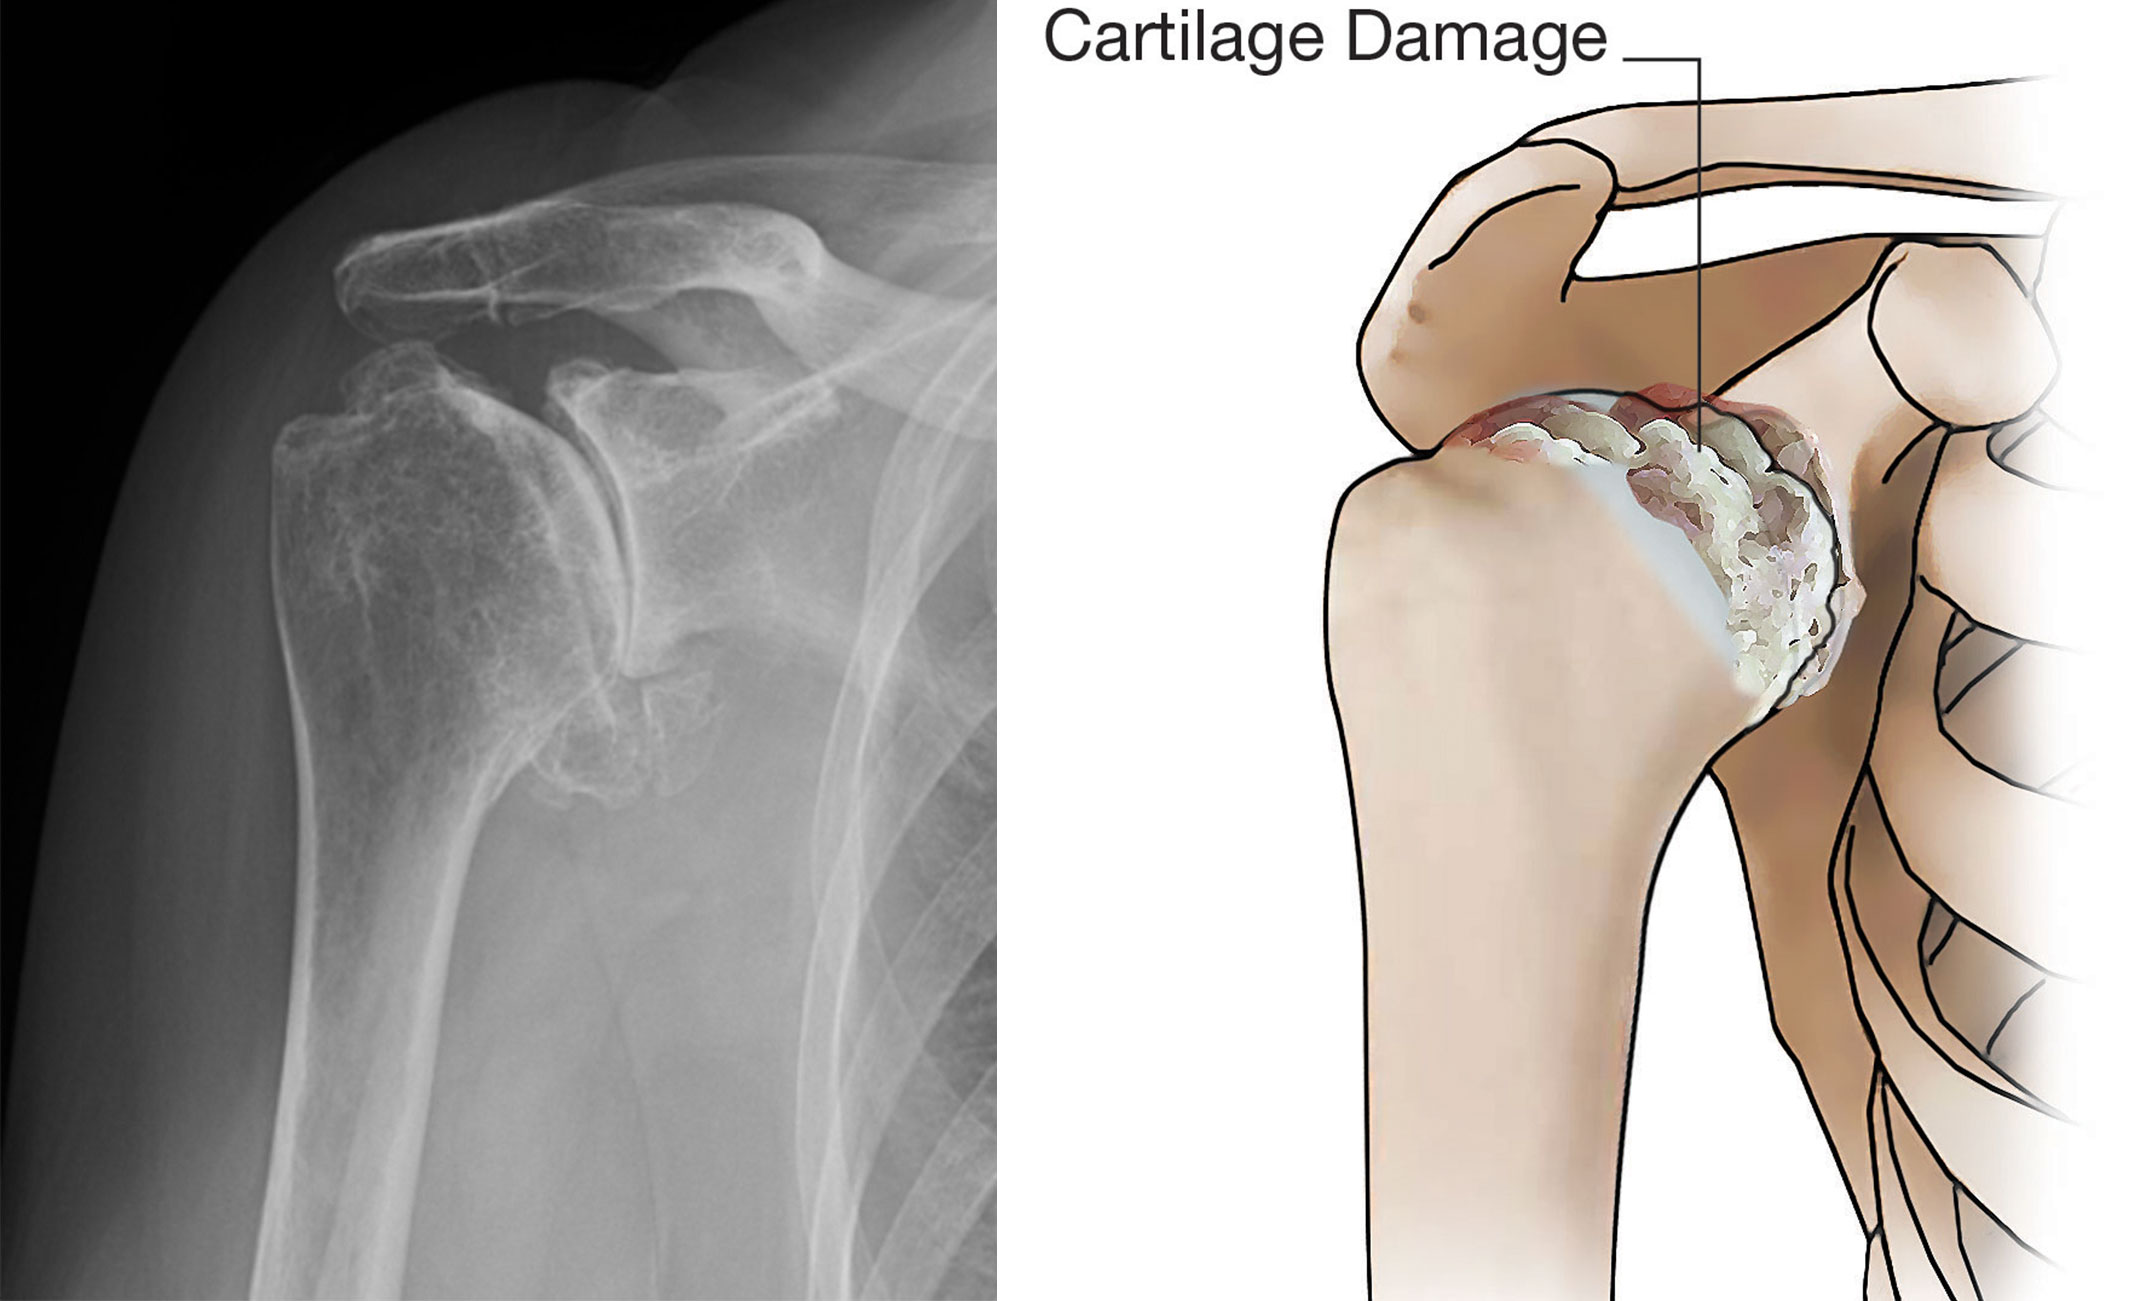
{{ c.nonSurgical }}
Shoulder replacement is an elective operation, and the decision is driven by how much the shoulder is limiting your life — night pain, loss of rotation, inability to reach overhead or behind the back — rather than by the appearance of the X-ray alone. Nonoperative treatment is exhausted first, and in younger patients joint-preserving options are considered before an implant is recommended.
When replacement is the right answer, the choice between an anatomic and a reverse replacement is made from the rotator cuff and the glenoid, not from age alone. Every case is planned from a dedicated CT scan using three-dimensional software, so glenoid version, inclination, and bone loss are measured before the operation and the implant position is decided in advance rather than estimated in the operating room.
Bone is preserved wherever possible — stemless or short-stem humeral components and augmented glenoid components allow correction of wear patterns without bone grafting in most shoulders, and leave better options behind should a revision ever be needed decades later.
{{ c.surgical }}
Two questions decide almost every shoulder arthritis operation: is the rotator cuff functioning, and is there enough glenoid bone to support a socket component. An anatomic replacement reproduces normal shoulder mechanics but depends entirely on an intact cuff; a reverse replacement changes the mechanics so the deltoid — not the cuff — powers elevation.
| Option | Best suited for | What is replaced | How the arm is elevated | Trade-offs and durability |
|---|---|---|---|---|
| Anatomic total shoulder arthroplasty | Primary osteoarthritis with an intact, functioning rotator cuff and enough glenoid bone to support a socket — the most common indication | Humeral head replaced with a metal ball on a stemless or short stem; glenoid resurfaced with a polyethylene socket | By your own rotator cuff, through near-normal mechanics — typically the best rotation and the most natural-feeling shoulder | Depends on the cuff for life: a later cuff tear or glenoid component wear is the usual reason for revision. Roughly 90–95% survive 10 years; permanent overhead lifting limits apply |
| Reverse total shoulder arthroplasty | Cuff tear arthropathy, an irreparable rotator cuff tear, severe posterior glenoid wear or bone loss, fracture sequelae, inflammatory arthritis, and revision of a failed replacement | Mechanics are inverted: a metal ball (glenosphere) is fixed to the glenoid and a socket to the humerus | By the deltoid, which is given a mechanical advantage — reliable pain relief and forward elevation even with no working cuff | Internal and external rotation are usually less than an anatomic replacement (reaching behind the back can stay limited). Modern designs commonly reach 90% survival at 10 years |
| Hemiarthroplasty | Selected younger, high-demand patients who want to avoid a polyethylene glenoid component, and some fracture or avascular necrosis cases where the glenoid cartilage is preserved | Humeral side only; the glenoid is left alone | By the native rotator cuff, as in an anatomic replacement | No glenoid component to wear out, but pain relief is less predictable and recovery slower; a proportion later require conversion to a total replacement |
Why the distinction matters: the rotator cuff is the deciding factor. Placing an anatomic replacement in a shoulder with a failing cuff leads to early loosening of the glenoid component and pain, while a reverse replacement placed in a shoulder with a healthy cuff gives up rotation that could have been kept. This is why an MRI of the cuff and a CT of the glenoid are obtained before the plan is finalised.
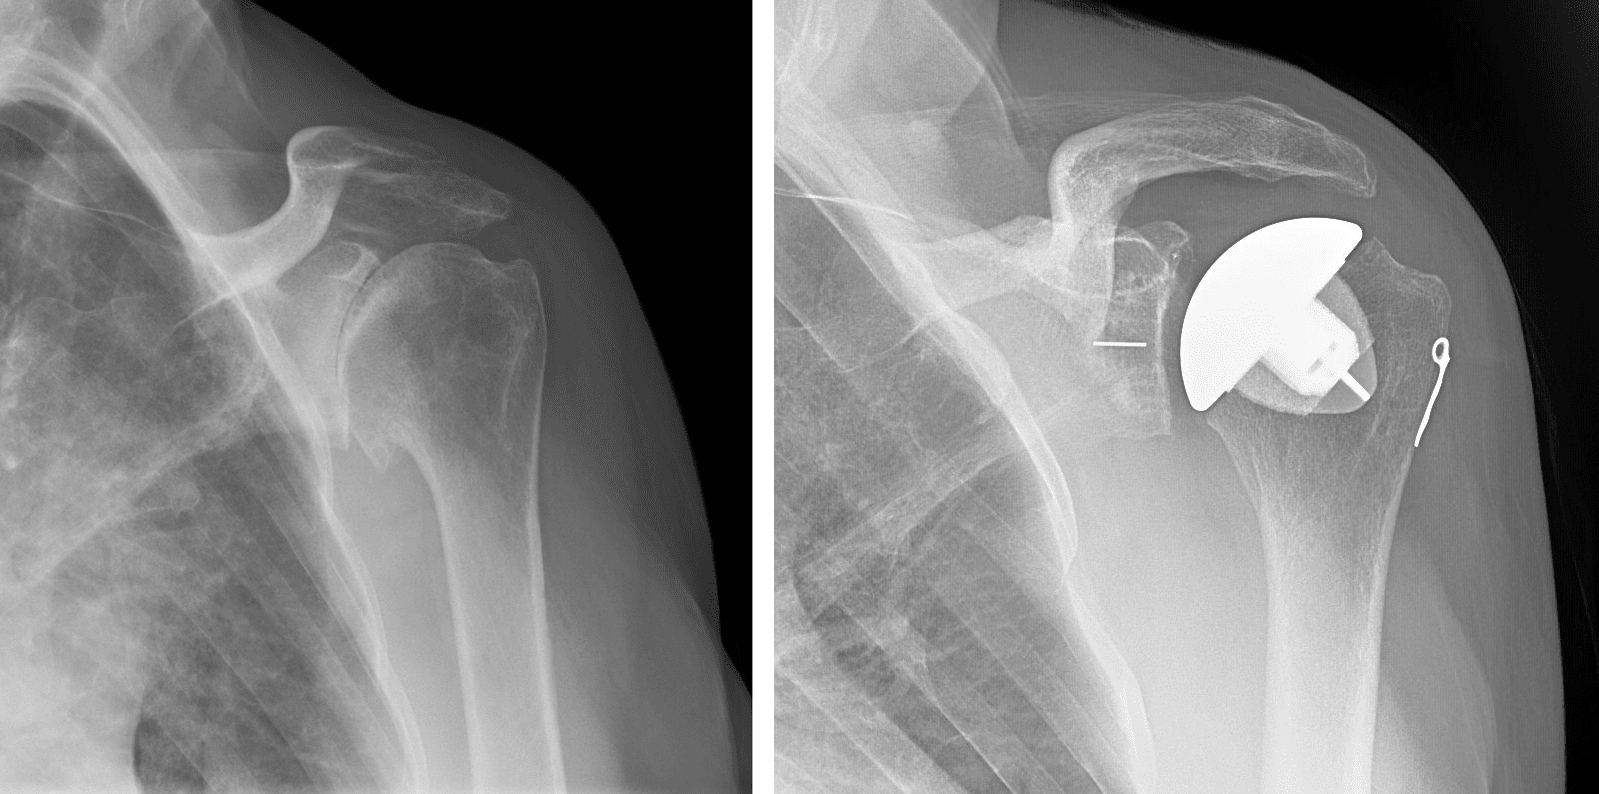
Through a front (deltopectoral) approach, the subscapularis tendon is taken down and later repaired, the arthritic humeral head is removed, and spurs are cleared. The glenoid is prepared to the planned version and a polyethylene socket — augmented on one side when there is posterior wear — is cemented or press-fit in place. A trial ball is used to balance soft-tissue tension and confirm motion before the final stemless or short-stem component is seated. Because the subscapularis repair must heal, active internal rotation and pushing are protected for about six weeks.
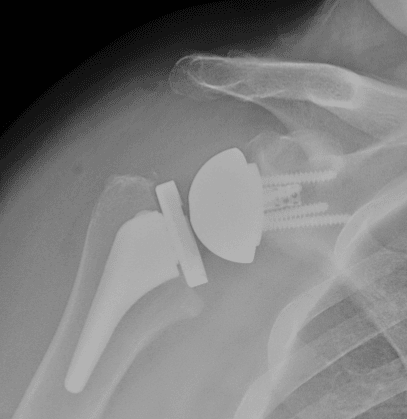
A baseplate is fixed to the glenoid with a central post and peripheral screws — augmented or bone-grafted when wear has been severe — and a glenosphere is attached. The humerus is prepared for a socket-bearing component, and the amount of lengthening and lateralisation is set to tension the deltoid without over-tightening the arm. The subscapularis may be repaired or left unrepaired depending on the design and tissue quality. Elevation is often possible early, but combined extension, adduction, and internal rotation — the position that levers the implant out — is avoided for the first six weeks.
Both operations are usually performed under a regional nerve block with light general anaesthesia, take roughly one and a half to two hours, and are increasingly done as a same-day or single-overnight stay in appropriately selected patients.
Shoulder replacement is among the most reliable operations in orthopaedics for pain relief, but it is a major procedure with real risks that are worth weighing: infection, bleeding, blood clots, nerve injury (most often a temporary axillary or musculocutaneous nerve stretch), periprosthetic fracture of the humerus or glenoid, and anaesthetic complications. Implant-specific risks include loosening of the glenoid component over time, polyethylene wear, and — after an anatomic replacement — later rotator cuff or subscapularis failure, which is the most common reason such a shoulder is converted to a reverse. Reverse replacements carry their own profile: dislocation, acromial stress fracture, scapular notching, and persistently limited internal rotation. Stiffness, incomplete pain relief, and asymmetry in strength between sides also occur. Overall revision rates are low, but the risk is higher in younger, heavier, and higher-demand patients and in revision surgery.
Pain relief. The most predictable result of either replacement. The large majority of patients report substantial or complete relief of arthritis pain, and restored sleep is often the change patients notice first.
Motion and strength. Anatomic replacements generally regain the best rotation and the most natural feel. Reverse replacements reliably restore forward elevation but often leave internal and external rotation short of normal, which matters for reaching behind the back and fastening clothing.
Durability. Registry data show roughly 90–95% of anatomic replacements and about 90% of modern reverse replacements still functioning at ten years, with the majority lasting considerably longer. Younger and higher-demand patients should expect a higher lifetime chance of revision.
Follow-up visits at six weeks, three months, one year, and periodically thereafter track motion, strength, and implant position on X-ray. Lifetime activity guidance — avoiding repetitive heavy overhead lifting and impact loading — protects the implant and is discussed individually.
Please review the following HSS guides for shoulder replacement, which include a comprehensive overview of what the surgical experience will be like, precautions and positions after surgery, rehabilitation exercises, and tips for performing activities of daily living after surgery. These resources are customized specifically to right and left shoulder replacement.
Most of the work of a successful shoulder replacement happens before the day of surgery — in the imaging that defines the implant plan, the medical preparation that lowers complication risk, and the practical setup at home that makes the first six weeks manageable with one arm.
| Study | What it answers | How it changes the plan |
|---|---|---|
| X-rays, including a true axillary view | Confirms bone-on-bone arthritis, spur formation, and how far the humeral head has migrated | Establishes that arthritis — not the cuff or the neck — is the pain source, and screens for superior migration that suggests cuff failure |
| CT with three-dimensional planning software | Glenoid version, inclination, and the exact pattern and volume of bone loss | Determines whether a standard or augmented glenoid component is used, the corrected implant position, and whether bone graft is needed |
| MRI of the rotator cuff | Whether the cuff is intact, and the quality and fatty atrophy of the muscles | The single biggest determinant of anatomic versus reverse replacement |
| Medical and anaesthetic evaluation | Cardiac, pulmonary, diabetic, and blood-count status; medication review | Confirms suitability for a regional block, and whether the case can be same-day or should include an overnight stay |
Stop nicotine in all forms — it measurably raises infection and healing complications. Bring HbA1c under control if you are diabetic, treat any active infection including dental problems, and review blood thinners, anti-inflammatories, and immune-modulating medication with the surgical team so they are stopped or held at the right interval.
Move everyday items to waist height, buy front-opening shirts and slip-on shoes, set up a recliner or wedge pillow for sleeping upright, and stock easy meals. Arrange help for driving, showering, and cooking for the first one to two weeks, and organise time off work in advance — desk work is often two to four weeks, physical work considerably longer.
A pre-operative therapy visit is used to fit and practise the sling, learn how to dress and shower with it on, and practise the passive motion exercises you will start within days. Patients who arrive knowing the protocol move through the first phase noticeably more smoothly.
See also Preparing for Surgery and General Tips After Surgery.
{{ c.recovery }}
The two operations follow the same overall arc but protect different structures: an anatomic replacement protects the repaired subscapularis, while a reverse replacement protects against the positions that can dislocate the implant. Your own protocol is individualised, and the timeline below is a guide rather than a rule.
| Phase | Sling & motion | Therapy focus | Daily life | Differences by implant |
|---|---|---|---|---|
| Weeks 0–2 Protection |
Sling worn essentially full time, removed for exercises and hygiene; gentle passive elevation and external rotation within set limits | Pain and swelling control, elbow, wrist and hand motion, posture and scapular setting, pendulums | Sleeping upright in a recliner or on a wedge is usually most comfortable; help needed for dressing and showering | Anatomic: no active internal rotation, no pushing. Reverse: avoid extension with the arm behind the body |
| Weeks 2–6 Motion |
Sling weaned over this window; passive motion progresses toward full, active-assisted motion begins | Restoring elevation and rotation without forcing end range; light functional use of the hand and elbow at waist level | Most patients are independent in dressing and eating; driving typically resumes once out of the sling and off narcotics — often 3–6 weeks | Anatomic: subscapularis repair still protected. Reverse: elevation often progresses faster and feels easier |
| Weeks 6–12 Strength |
No sling; full active motion encouraged | Progressive rotator cuff, deltoid, and periscapular strengthening with bands then light weights | Light household tasks, cooking, and desk work without restriction; lifting limited to a few pounds early in the phase | Anatomic: internal rotation strengthening begins. Reverse: deltoid-focused, with rotation expectations set realistically |
| 3–6 months Function |
Unrestricted motion; strengthening continues at home | Endurance, overhead capacity, and sport- or job-specific work | Golf, doubles tennis, swimming, and gym work are reintroduced in stages with clearance | Reverse replacements are generally cleared for a narrower range of overhead loading |
| 6–12 months Plateau |
Final motion is usually reached by 6–9 months | Maintenance programme two to three times weekly | Strength and comfort continue to improve to about a year | Permanent guidance for both: no repetitive heavy overhead lifting |
Encouraged long term. Walking, hiking, stationary cycling, swimming (freestyle and backstroke once cleared), golf, doubles tennis or pickleball, light gym work below shoulder height, and gardening.
Case by case. Overhead racquet serving, kayaking and rowing, yoga positions that load the arm, and manual labour above shoulder height — timing and volume are set individually.
Not advised. Contact and collision sport, gymnastics or heavy weight-bearing on the arms, repetitive maximal overhead lifting, and impact tools — these shorten implant life and risk fracture around the components.
A general upper limit of roughly 25–30 pounds overhead is applied permanently, with lighter limits in the first six months. Protocols are available under Physical Therapy Protocols.
Disclaimer: All materials presented on this website are the opinions of Dr. Kyle Kunze and any guest writers, and should not be construed as medical advice. Each patient’s specific condition is different, and a comprehensive medical assessment requires a full medical history, physical exam, and review of diagnostic imaging. If you would like to seek the opinion of Dr. Kyle Kunze for your specific case, we recommend contacting our office to make an appointment.